Fig. 1 - View of "Create Cookie Notification . . ." UI (v2.3)
Cookie Notifier is a Dreamweaver (DW) command application that allows web page developers to insert code into their web pages so that when the page is first viewed, a notification is dispslayed alerting the viewer of that web page that cookies are being used. This information is kept in a cookie and, as long as that cookie is not deleted, this notification is no longer displayed when viewing the page. If a web-page viewer has disabled cookies in their browsers, then this application does not work.
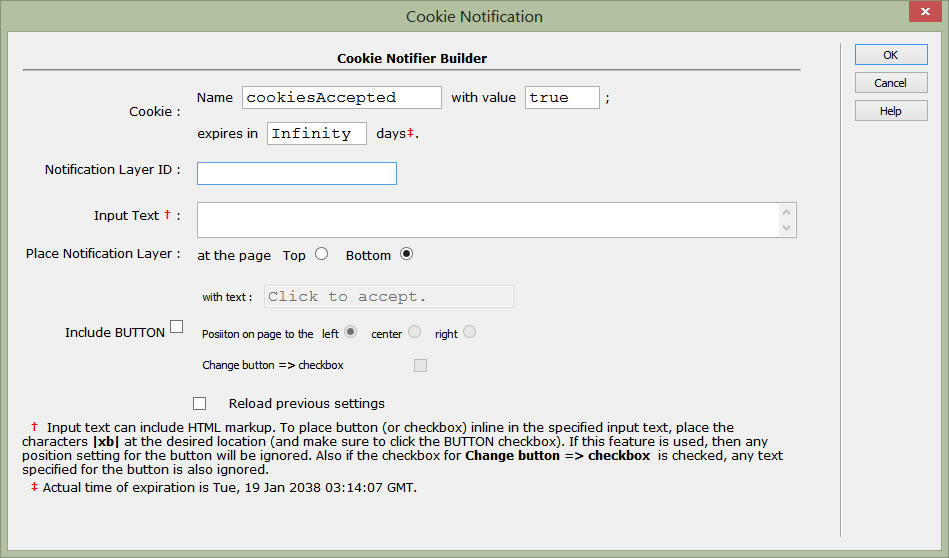
Once the application is installed in DW, it is accessed via Commands -> Goodies -> Create Coookie Notification ..., which opens the UI shown below.
Fig. 1 - View of "Create Cookie Notification . . ." UI (v2.3)
As shown, some values have already been set, but these are completely changeable by the web developer. The default location of the layer is at the bottom of the page, but that, too, can be changed to the 'top'of the page, by selecting that value in the line Place Notification Layer. Text to be displayed in the layer is placed in the Input Text region and may also include HTML markup. By clicking the check box labelled Include BUTTON, a button with the text specified will be inserted on either the left, center, or right of the page. The button is placed on its own line wrapped in <p></p> tags, unless the special character set |xb| has been inserted into the input text string. To change the button to a checkbox form element, just select the Change button => checkbox box. As noted in the explanation at the bottom of the UI, the button (or checkbox) can be positioned where the web developer wishes by inserting the characters |xb| (which stands for checkbox) at the location where it is desired. This becomes effective only if the Include BUTTON checkbox has been checked.
New to version 2.3 is the inclusion of the checkbox labelled Reload previous settings. Settings entered into the UI are saved in the file rb_CNApp.js located in the directory rbcn (another reason for not deleting it). Thus if this file exists, checking this box will read that information and reloads them into the UI for you. NOTE: if an element with the same id as that specified in Notification Layer Id is found in the document, there will be a warning telling you to change it since id values must be unique on a page.
The cookie created never expires (but see explanation in the bottom of the UI), but can be changed to any number of days by entering that value in the appropriate box.
Once the "OK" is clicked, the application inserts code into the web page and creates a minimum style sheet (rbCN.css) in the directory rbcn located where the web page is located. That style sheet is very basic (see below) and can be edited by the web developer to stylizes it to his liking, after this application has been run once.
#layerId {
     background-color: #FFF;
     position: fixed;
     left: 0px;
     pgPos: 0px;
     padding: 10px 30px;
     color: #000;
     width: 100%;
     z-index: 999999999;
     font-family: Verdana, Arial, sans-serif;
}
where layerId and pgPos (top or bottom) are the values specified in the UI. The following properties can be modified by the web developer -- background-color, padding, color, and font-family; the other properties should be left as is. Properties such as border (top and/or bottom) can be added if desired. The z-index value is set to a high value to make sure that it lies above other elements on the page that may also have their z-indices set. The width value ensures that the notification layer spans the whole viewport. If the web developer, wants to span just a part of the viewport, then this value can be edited too but positioning information should also be included.
On a normal web page, the code for handling the notification layer and its display is placed just before the closing </body> tag. On template-based pages, it is inserted just before the last <!-- InstanceEndEditable --> tag. If, as a web developer, you are not comfortable with that placement, then create another editable region on your web page that lies as close to the closing </body> tag as possible so that the code may be placed there.
The code inserted by this application can be removed via Commands -> Goodies -> Remove Cookie Nofication ... which displays the following UI.

Fig. 2 - View of "Remove Cookie Notification . . ." UI
If the checkbox about removing the directory rbcn is checked, then the style sheet rbCN.css and the file rb_CNApp.js are also removed, and thus any customizing that has been done to the notification layer.